Free dotnet hosting! Or... having fun with dotnet
Table of Contents
I’ve been wanting to test the new features of dotnet, and language syntax, and also to learn more about observability and specifically OpenTelemetry.
Since I’m cheap, I wanted to find a free host to test this.
Part 1 - Create Simple API #
In this first part I just want a simple aspnet project running. Nothing fancy, just build and deploy.
My first idea was to use the Azure free tier, but it required a credit card to sign up, so I gave up.
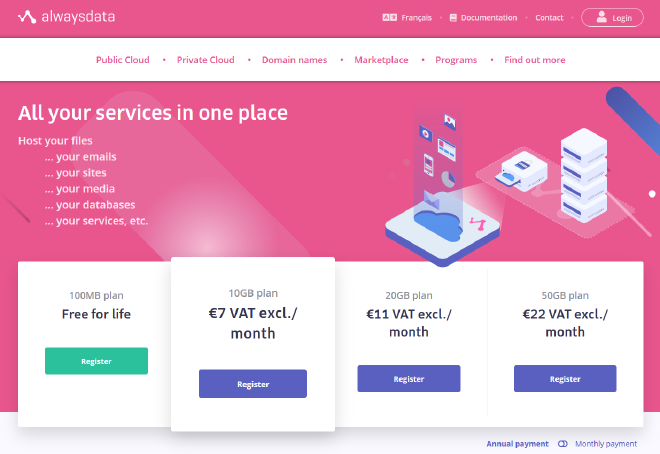
After searching I ended up choosing AlwaysData , which is a hosting provider that offers a free tier that has a server with dotnet 8.0 already pre-installed, as well as ssh access, with 100Mb of storage. It also offers managed databases, which I want to explore later. It also offers free https for your websites. Thank you AlwaysData! You are very generous!
Simple minimal Api #
I simply used the dotnet new web command to create a new web api project.
It scaffolds for me the csproj, and the Program.cs files.
alwaysdata.csproj #
<Project Sdk="Microsoft.NET.Sdk.Web">

  <PropertyGroup>
    <TargetFramework>net8.0</TargetFramework>
    <Nullable>enable</Nullable>
    <ImplicitUsings>enable</ImplicitUsings>
  </PropertyGroup>

</Project>
Program.cs #
var builder = WebApplication.CreateBuilder(args);
var app = builder.Build();

app.MapGet("/", () => "Hello World!");

app.Run();
To make this ready to deploy it’s simply a matter of running the publish command, targeting linux as the runtime
The following command creates an “out” directory with all the necessary assets.
dotnet publish -o out -r linux-x64
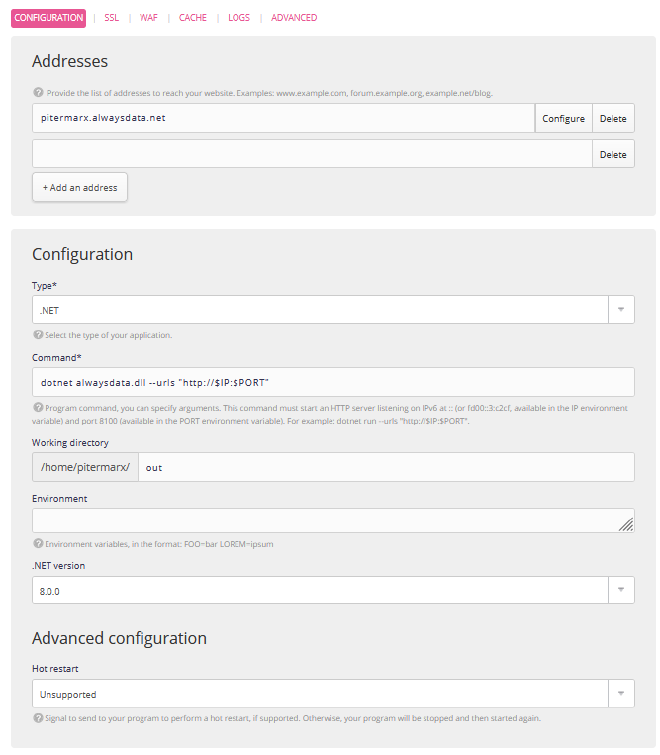
AlwaysData setup #
To setup the website I did the following steps.
Firstly, I created the website
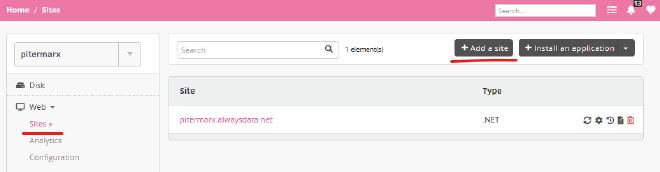
Configured all the parameters, I set the app to run on a directory called “out” (not the greatest name…)
Deploy #
Then after configuring SSH , I’m ready to deploy
# Build
dotnet publish app -o out -r linux-x64
# Powershell zip compression
Compress-Archive out out.zip
# Copy to the host
scp out.zip pitermarx@ssh-pitermarx.alwaysdata.net:~
# ssh to the host, remove old app, unzip uploaded file, delete zip
ssh pitermarx@ssh-pitermarx.alwaysdata.net 'rm out -rf;unzip out.zip;rm out.zip'
A final step, to make sure everything is working is to restart the app. I do this via the alwaysdata API .
Also with a bit of powershell magic, this is easily done
function toBase64([Parameter(ValueFromPipeline)]$inputString) {
    $bytes = [System.Text.Encoding]::UTF8.GetBytes($inputString)
    [System.Convert]::ToBase64String($bytes)
}

$siteId = "1234 your site id"
$apiKey = "your api key"
$account = "your account name"
$authInfo = "$apiKey account=$account:" | toBase64
$url = "https://api.alwaysdata.com/v1/site/$siteId/restart/"
Invoke-WebRequest -Uri $url -Method Post -Headers @{Authorization=("Basic $authInfo")}
One thing that wasn’t obvious for me was finding out this button where you can create the API keys. You’ll find it on your profile page.

Part 2 - Observability #
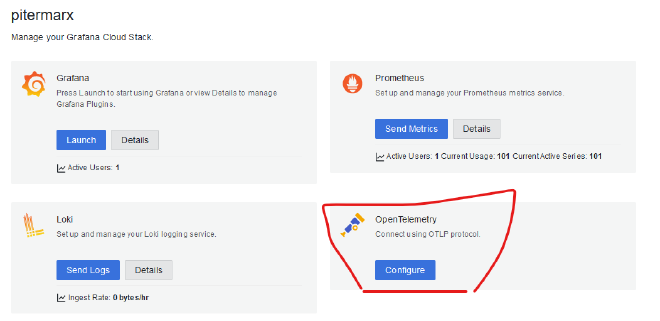
For hosting my logs, traces and metrics I found that grafana gives a very generous free tier as well. So I ended up going with it.
In addition to this, grafana provides a dotnet library that wires up almost everything automatically, Grafana.OpenTelemetry .
Update App #
This is the full source code to wire up everything. The only noteworthy thing is that since the package has lot’s of builtin instrumentations , it was taking several seconds to startup the app, until I removed the ones I will not be using.
WebApplicationBuilder builder = WebApplication.CreateBuilder(args);

Meter meter = new ("pitermarx.alwaysdata", "1.0.0");
ActivitySource activitySource = new ("pitermarx.alwaysdata", "1.0.0");
var countGreetings = meter.CreateCounter<int>("greetings.count", description: "Counts the number of greetings");

builder.Services
    .AddHttpClient()
    .AddLogging(l => l.AddOpenTelemetry(c => c.UseGrafana()))
    .AddOpenTelemetry()
    .UseGrafana(config =>
    {
        // Removing stuff I dont need for faster startup
        config.Instrumentations.Remove(Instrumentation.AWS);
        config.Instrumentations.Remove(Instrumentation.AWSLambda);
        config.Instrumentations.Remove(Instrumentation.AWSResource);
        config.Instrumentations.Remove(Instrumentation.Owin);
        config.Instrumentations.Remove(Instrumentation.Hangfire);
        config.Instrumentations.Remove(Instrumentation.Wcf);
    })
    .WithMetrics(metrics => metrics
        .AddAspNetCoreInstrumentation()
        .AddHttpClientInstrumentation()
        .AddMeter(meter.Name))
    .WithTracing(tracing => tracing
        .AddAspNetCoreInstrumentation()
        .AddHttpClientInstrumentation()
        .AddSource(activitySource.Name));

WebApplication app = builder.Build();
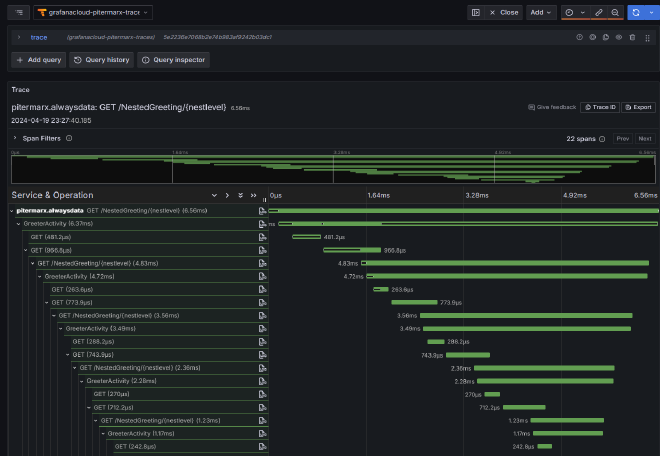
Following the pattern defined by Microsoft’s documentation on OpenTelemetry , I created the following endpoint, to see nested traces.
app.MapGet("/NestedGreeting/{nestlevel}", SendNestedGreeting);
async Task SendNestedGreeting(int nestlevel, ILogger<Program> logger, HttpContext context, IHttpClientFactory clientFactory)
{
if (nestlevel > 5)
{
// Log a message
logger.LogError("Greeting nest level {nestlevel} too high", nestlevel);
await context.Response.WriteAsync("Nest level too high, max is 5");
return;
}
using Activity? activity = activitySource.StartActivity("GreeterActivity");
activity?.SetTag("nest-level", nestlevel);
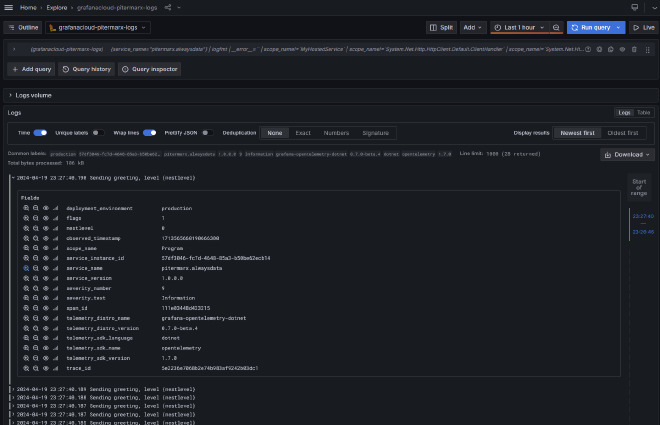
logger.LogInformation("Sending greeting, level {nestlevel}", nestlevel);
countGreetings.Add(1);
await context.Response.WriteAsync($"Nested Greeting, level: {nestlevel}\r\n");
if (nestlevel > 0)
{
HttpRequest request = context.Request;
Uri url = new Uri($"{request.Scheme}://{request.Host}/NestedGreeting/{nestlevel - 1}");
// Makes an http call passing the activity information as http headers
using HttpClient client = clientFactory.CreateClient();
string nestedResult = await client.GetStringAsync(url);
await context.Response.WriteAsync(nestedResult);
}
}
Setup Environment #
To make this all work, I just need to create a few environment variables on the alwaysdata admin page for my website. The variables are as follows
OTEL_EXPORTER_OTLP_PROTOCOL=http/protobuf
OTEL_EXPORTER_OTLP_ENDPOINT=https://otlp-gateway-prod-eu-west-0.grafana.net/otlp
OTEL_EXPORTER_OTLP_HEADERS=Authorization=Basic a-secret-token
The specific values come from your grafana account admin page, which I admit, took me a long time to find… It’s all documented here though…
Profit #
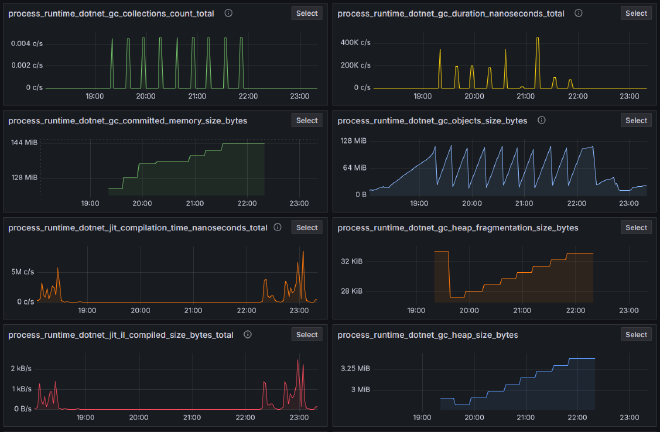
Now I have a fully instrumented dotnet app. It has Metrics!
It has Traces!
It has Logs!
Outro #
I’ve had too much fun with this. But there are still so many interesting things to try!! Databases! Entity Framework! Authentication! Aspire ! YARP
I need to sleep…